To add your Azure Cloud Account to Cloudnosys, follow the steps below.
Name Your Cloud Account #
- Navigate to the Cloud Accounts list page from the Setup module.
- Click on the Add Account button.
- Select Azure as your Cloud Account Provider.

- Give a name to your Cloud Account. Choose a name that will make it easily differentiable if you add more Azure accounts with Cloudnosys.

- Click on the Next button to go to the next step.


Retreive & Enter Credentials #
- Next, you have to enter your Azure Cloud Account credentials which you can get from the Azure portal.

- Sign in to the Azure management portal in a separate browser window and select the Azure Active Directory from the side menu.

- Navigate to App Registrations, and then click on the New Registration button.

- Fill in details for the Cloudnosys application, and then click Create.
- Enter a suitable name for the application.
- Select your supported account type, which determines who can use the application (Recommended: Let the choice be the 1st option by default)
- After setting up the values, click on the Register button.

- Now add the application to the “Reader” role on the subscription you are using, by following these steps:
- Go to Subscription and select “Access Control (IAM)” from the blade.
- Click on “+ Add” and select “Add Role Assignment”.
- Select the “Reader” Role and click on “Next”.
- Click on “+ Select Members” and search for the application that you’ve just created, using the Application name or Object ID.
- Click on the application name and then “Select”.
- Now click on the “Review + assign” button to complete the RBAC role assignment process.
- Copy the Application (client) ID and the Tenant ID for Cloudnosys Azure cloud account details and paste them under the required field in the Cloudnosys dashboard.

- On the App registration page, select the application, then select Certificates & Secrets in the menu on the left. Add a description for the client’s secret and include the ‘expiry date’ (suggested: one year). Click on the Add button to generate the Secret key ID.

- Copy this value because you aren’t able to retrieve the key later. You provide the key value with the application ID to sign in as the application. Store the key-value where your application can retrieve it.

- For the Subscription ID, go to the “Cost Management and Billing” page and select your Subscription Id. Copy the Subscription ID from the Azure console and paste it under the required field.

- Enter all the relevant service account credentials in the relevant fields, and then click on the “Test Connection & Add Cloud Account” button.


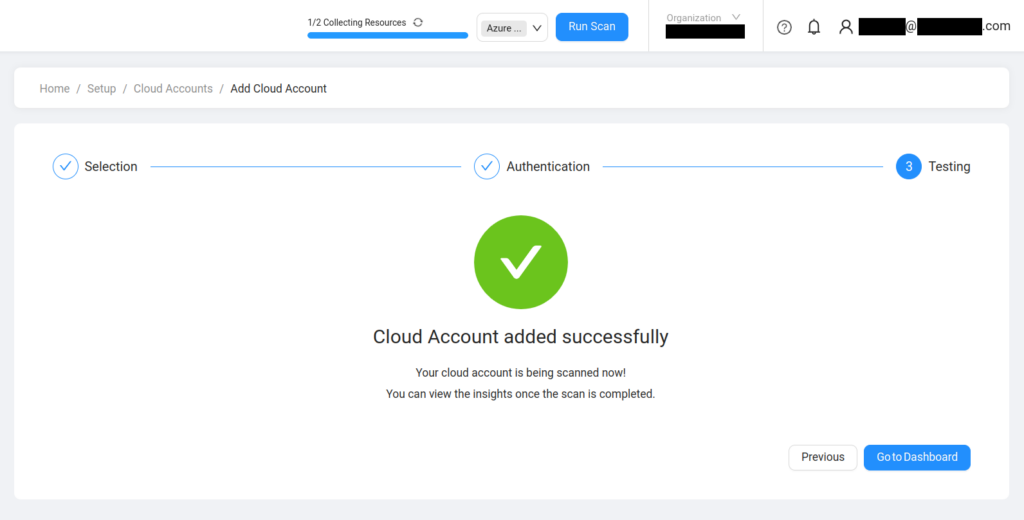
Testing & Scanning #
Once you are on the Testing step, Cloudnosys will run a few tests to ensure that the Cloud Account got integrated properly with the intended settings.
As soon as the connection gets established successfully, the scan will begin running instantly.