Email #
 Email
Email For instance, you want to notify users when risk is generated so you can use Email action to notify users by adding recipients. The default “from” address is [email protected].
Setting up an email alert
In this example, we are sending an email when risk is generated
- Add playbook then choose “New risk” trigger
- Select “Risk Status” as “fail” so when any signature fails, this playbook will be automatically triggered
- Define “Cloud Account” for which you want to trigger this playbook
- Add “Service” for which you want to trigger this playbook
- Define the “Resource(s)” of the service you added above so that this playbook will be triggered when any risk is found in these resources. But it’s recommended not to specify resources, so when this playbook is run it’ll check all resources included in the cloud account which you have selected.
- Define “Signature(s)” so that when any signature fails, this playbook will be automatically triggered

2. Now connect Email action under the trigger and define recipients, subject, and message

and then save playbook.
So whenever in the service AWS S3 of cloud account “AWS”, signature “Ensure S3 bucket logging is Enabled” fails means bucket logging is not enabled for one or more buckets, then this Playbook will be automatically run and an Email will be sent each time to the specified recipients.
Output

 AWS #
AWS #
 AWS
AWS AWS action enables users to make API calls to their AWS infrastructure to get data e.g “list-bucket” or perform an action like “delete-bucket”. You need to provide information in input fields such as cloud account, service, service params, endpoint, params, etc.
Example usage for S3 Bucket versioning remediation
- Add Playbook then select “New Risk” so this playbook will be triggered automatically when a new risk is detected
- Define “Risks Status” as “fail” so when a signature which is defined in this trigger fails then this playbook will be automatically triggered
- Define “Cloud Account” whose resources/services you will use in this playbook
- Define “Service” so when any risk is found regarding that service then this playbook will be triggered. Since we are going to remediate the AWS S3 bucket versioning so we’ll use AWS S3
- Define “Resources” of the service so when these resources are at risk, this playbook will be automatically triggered
- Define “Signature” which will apply security check on the above-mentioned resources of the service AWS S3. We will select “Ensure S3 Bucket Versioning is Enabled” so when if there exists any bucket(s) whose versioning is disabled is then playbook will be automatically triggered
Output:
When any new risk is detected, this playbook will be automatically triggered and in Trigger action, you will get payload for New Risk in Output:

2. Now connect AWS action
- Define name as “Enable Bucket Versioning”
- Define cloud account whose services you are going to use in this playbook or you can reference in from the trigger data e.g ${trigger-1.payload.risk.cloudAccount}
- Define the service for which you want to run this playbook, since we are remediating AWS S3 bucket versioning so we’ll select AWS S3

- In “Service params” add API version & reference region from the output of Trigger. Since in trigger, we will get region(s) in which S3 bucket
{"apiVersion": "2006-03-01",
"region": ["${trigger1.output.payload.risk.region}"]}
- Add “Endpoint” for S3 bucket versioning:

- In Params, get buckets from Trigger output and set bucket configuration status as “Enabled” to enable AWS S3 Bucket versioning.
{"Bucket":"${trigger1.output.payload.risk.resourceId}",
"VersioningConfiguration": { "Status": "Enabled" }}
Output:

3. Now connect Condition action to check if the output of Trigger action (Buckets with versioning disabled) is the same as the output of AWS action, which says that the versioning of some or all buckets in the selected cloud account is enabled. If the condition is met, actions on the true branch will run and false the action on the false branch will be executed
${aws-1.output.result[0].region} = ${trigger-1.output.payload.risk.region}

This condition depicts that if AWS action output(AWS S3 regions with bucket versioning enabled) is the same as Trigger output (AWS S3 regions with bucket versioning disabled) which means all AWS S3 bucket(s) versioning is enabled and if it’s not the same means one or more AWS S3 bucket(s) with versioning disabled exists.In this example, some AWS S3 buckets have versioning disabled so, the false branch will be executed:

4. Now connect Email action and add recipients to inform the user(s) that AWS S3 bucket versioning is disabled for some bucket(s)

The overall flow of the playbook will look like this:

 Condition #
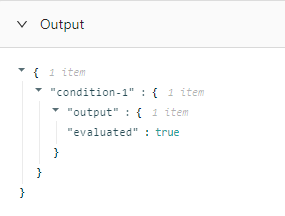
 Condition
 Through this action user can define conditions so when the playbook is run, actions are taken according to the conditions defined. If Conditions are met then actions on the “true” branch will run and if conditions are not met then actions on the “false” branch will be performed.
A simple example using Condition action
In the below example we are checking if S3 buckets exist in the us-east-1 and having Tag “Production”.
- Click on “Add Playbooks” then select the “New Risk” trigger and add other input fields as shown in the image below:

Output: In the output of Trier, we will get the bucket(s) that have AWS S3 bucket versioning disabled.
Note: In New Risk Trigger, the playbook will be triggered automatically each time when a new risk is detected in the specified service of the cloud account selected in the New Risk input fields.
- Connect AWS action under the trigger to get buckets with Tags.
Select cloud account & service “AWS S3” Add Service params to specify API version and region. The output of the trigger will return the bucket(s) which has AWS S3 bucket versioning disabled so in the region, we are using the output of the trigger as a payload.

{"apiVersion": "2006-03-01",
"region": ["${trigger-1.output.payload.risk.region}"]}
- Add endpoint “
getBucketTagging” to get the bucket Tags
- In params pass the bucket which you’ll get from the trigger output
{"Bucket":"${trigger-1.output.payload.risk.resourceId}"}

2. Now connect Condition action

and set condition by referencing it with the output of the above action AWS
${aws-1.output.result[0].region} = us-west1
${aws1.output.result[0].TagSet[0].Value}= Production
This means that if buckets exist in region “us-west-1” having the tag “Production” then perform actions defined on the true branch else run false.
- Now attach AWS action on the true branch to remediate AWS S3 bucket versioning and select cloud account, service as AWS S3, service params having API version & region, then add Endpoint “putBucketVersioning” and in Params pass the bucket(s) which you will et from the output of trigger action, then set version configurations Status as “Enabled”.
- On the False branch of the Condition action, connect Email action then add input fields for recipients.

- Then connect Condition action

${aws-2.output.result[0].region} = ${aws-1.output.result.region}
This condition is basically checking if AWS-1 (Get the bucket with Tag) output is the same as AWS-2(Remediate buckets). So if this condition falls true means bucket remediation is done successfully so actions on the true branch will be executed, and if remediation is not successful then actions on the false branch will execute.
- Now connect Email action on the false branch to get an email when bucket remediation fails. However, It’s an optional action.
The overall flow of the playbook will look like this:

Now click save & run a scan. So if buckets in the us-west-1 having tag as “Production” with versioning disabled exists then this playbook will run automatically.
Output
Hence, S3 buckets exist in region us-west-1 having tag “Production”, the condition will be true and we will get output for condition action as:
Checking “false” condition: #
If they don’t exist in the region us-west-1 the condition will be false, we will get output for condition action as:

 Custom Code #
 Custom Code
 In Custom Code action, users can perform their customized actions by writing, through code in JavaScript. You can write custom logic & use functions in this action.
Example usage
List employees whose age is greater than 30 using custom code action
- Add playbook then select any trigger
- Drag and connect ‘Http’ action under the Trigger
- Select the method which you want to use for API calls. Since we want to get employees data so we’ll use the “GET” method

- Connect Custom Code Action: In this action, we want to list employees whose age is greater than 30.
Write code in JavaScript Code editor
let getHttpResponse = $[`http-1`]; // reference response from http node
let {
    status,
    data
} = getHttpResponse.output.response; // extract status and data from http node
// when response is success, filter out employees below the age of 30
if (status == 'success' && data.length > 0) {
    result = data.filter(eachRes => eachRes.employee_age > '30');
    return result;
}
Now click save & on “Run Playbook”
You will get Output:
Output:

 Http #
 Http
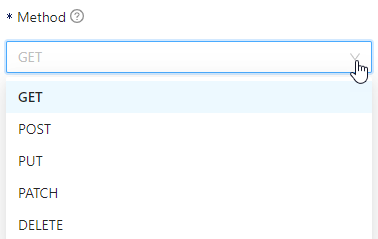
Http By using HTTP action, users can fetch data from third-party endpoints and make API requests through URL. You have to select any one request method:
- GET – fetch data from a resource
- POST & PUT – add or update data on a server
- PATCH – partial modifications to a resource
- DELETE – delete the resource
If you want to know more about HTTP Methods, click here.
And then provide a URL for making an HTTP call, header for authenticating API calls & add body in case if you are adding or updating data.
Example for HTTP using GET method
In this example, we will use the GET method to retrieve data from a rest API
- Add playbook, select any trigger
- Then connect HTTP action under the trigger
- Select the method which you want to use for API calls. Since we want to get employees data so we’ll use the “GET” method
- Add URL http://dummy.restapiexample.com/api/v1/employees
Now click save & then “Run playbook”
Output: You’ll get a response in output like this:

 Save Risk #
 Save Risk
 Through Save Risk action you can save risks from any data source
Example usage to get risks from third-party and Save them in Cloudnosys
In this example, we will get risks from the Security hub and then filter findings then save them using the Save risk action.
Click on create Playbook then in the trigger, choose Schedule and set the interval to “Every day” so it’ll run daily
Connect AWS action to get security hub findings
- Select the Cloud account from where you want to get findings
- Add Service, since we want to get findings for Security Hub so type “SecurityHub” in the service
- Add service params for the service “Security hub”
- Now add Endpoint “getFindings” of an AWS Service(Security Hub)

Connect custom code to filter Security hub findings
let securityHubResult = $[`aws-1`];
let findings = securityHubResult.output.result[0].Findings;return findings;
Connect Loop action so that when any finding is recovered this action will iterate and will target the next finding
- Add Data source from where you want to get data, in this case, Loop action will iterate on the output of custom code action so we will define it like “${custom-code-2.output.result}”
Inside the loop action, connect another Custom code action to format risks:
let eachVal = $[`loop-1`]; eachVal = eachVal.value; let risk = { title : eachVal.Title || '', pageDetail : eachVal.Description || '', findingId : eachVal.GeneratorId || '', severity : eachVal.Severity.Label.toLowerCase() || '', status : 'fail', riskMessage : eachVal.Description, resourceId : eachVal.Resources[0].Id || '' }
return risk5.
Then connect Save Risk action
- Add “Data source” from where you want to get risks as “AWSSecurityHub”
- Add “Title” to define your risk, since we will get risks from the output of another action() so we will reference it like “${custom-code-3.output.result.title}”
- Add Page Detail and reference it with Custom code action output like this “${custom-code-3.output.result.pageDetail}”
- Select Cloud Account “AWS”
- Add “Finding Id” “${custom-code-3.output.result.findingId}” to group findings uniquely
- Add “Tag” to group the resources of findings (”securityhub” )
- List “Resources” with the unique ID you got in the output of Loop action like ”${custom-code-3.output.result.resourceId}”
- Define “Severity” as “${custom-code-3.output.result.severity}”
- Add “Risk Status” as ”${custom-code-3.output.result.status}”
- Risk Message “${custom-code-3.output.result.riskMessage}”
The overall flow of playbooks to get risks from third-party service Security Hub and Save it in Cloudnosys

 Azure #
Azure action node provides a way for users to have the capability to call Azure APIs and fetch resources from the Azure infrastructure.
Example
Create a Playbook for the Azure Signature “Insert missing Security & Compliance tags for VMs”.
- Click on the “Create Playbook” button.

a. Click on the “New Risk” trigger

b. Click on the Trigger. This will display its properties.
c. Expand Input
d. Select an Azure cloud account, the service “Azure Virtual Machine (VM)” and finally the signature “Insert missing Security & Compliance tags for VMs”

Whenever you run the Playbook you will get output for this trigger as shown below:

2. Now connect Custom code action & add the below code:
let response = $[`trigger-1`]; let resourceGroup = response.output.payload.risk.resourceId.split("/")[4] || "";
return resourceGroup;


3. Now, connect the “Azure” action to insert tags for failed resources
a. Select your cloud account, change the Service type from “Selector” to “String” and finally, type the service name as “virtualMachines”
b. Add service params:
{ "resourceGroupName":"${custom-code-1.output.result}", "vmName":"${trigger-1.output.payload.risk.resourceName}" }
c. Type “update” in the Endpoint field

d. Add params:
{
"Tags": { "Name": "david",
"Client": "fexom",
"Environment": "dev",
"Project": "cloud",
"CreationDate": "CreationDate",
"DeleteOn": "DeletionDate",
"Owner": "Cloudnosys",
"Schedule": "Today",
"BU": "playbooks" }
}

Whenever you run the Playbook you will get output for this action as shown below:

4. Add “Condition” action to check the status of tags
a. In key, add:
${azure-1.output.result.provisioningState}
b. In value, type:
Succeeded

Whenever you run the Playbook you will get output for this action as shown below:

5. Then, connect the “Email” action at the false node, to get notified when this playbook fails to add tags for Security & Compliance for VMs.
a. Expand “Input” and type all the details related to the email

b. Finally, save the Playbook.
The overall flow of the playbook will look like this:

 GCP #
GCP #
 GCP
GCP GCP action provides API call capability to the user. Through this node, users can make calls to their GCP infrastructure to fetch resources or make changes on their end (Write access required).
Example #
Enable OS login for a VM
- Go to playbooks, click the “Create Playbook” button:
2. Select “New Risk” trigger
It’ll take you to the playbook editor screen:
3. Click on the Trigger to open properties and then expand “Input”
a. Select Cloud account “GCP”
b. Select Service “GCP Instance”
c. Select Signature “Ensure os login is enabled for a Project”

Whenever you run the Playbook you will get output for this trigger as shown below:

4. Now, connect the “GCP” action to get project info
a. Select operations “ Raw request”
b. Type Endpoint “get”
c. Type Version “v1”
d. Select Cloud account “GCP”
e. Select Input type in Service “String” then type “compute”

f. In the Service params type “projects”
g. In params, add:
{
    "project": "${trigger-1.output.payload.risk.projectId}"
}

Whenever you run the Playbook you will get output for this action as shown below:

5. Connect “Custom code” action to add metadata
Add below code in a code block:
let response = $[`gcp-1`];
metdataItems = response.output.result.commonInstanceMetadata.items;
 let items;
 if (metdataItems) {
    items = metdataItems;
    items.push({ key: "enable-oslogin", value: true });
  } else {
     items = [];
      items.push({ key: "enable-oslogin", value: true });
        }
return items;

Whenever you run the Playbook you will get output for this action as shown below:

6. Add “GCP” action to configure os login on the project
a. Select “Raw Request” in Operations
b. In Endpoint type “setCommonInstanceMetadata”
c. In version type “v1”
d. Select cloud account “GCP”
e. In the service type select “String” then type “compute”

f. In “Service Params” type “project”
g. In “Params” add the below code:
{
 "project": "${trigger-1.output.payload.risk.projectId}",
    	 "resource": {
   	 "Fingerprint":
 "${gcp-1.output.result.commonInstanceMetadata.fingerprint}",
  	 "items": ${custom-code-1.output.result}
        }
 }

Whenever you run the Playbook you will get output for this action as shown below:

7. Now, connect the “Condition” action to check if os login is enabled
a. In key type:
${gcp-2.output.result.status}
b. In value type:
RUNNING

Whenever you run the Playbook you will get output for this action as shown below:
8. Now connect the “Email” action to get notified if this playbook fails to enable os login.
a. You will need to add recipients in To, Cc & Bcc:

The overall workflow will look like this:

You may also be interested in the following: